Want to avoid costly production mistakes? Sharing a complete, organized tech pack with your factory is the key. A tech pack is your garment’s blueprint, detailing every design and manufacturing element. Without it, manufacturers rely on guesswork, leading to errors, delays, and higher costs. Here’s a quick breakdown of the process:
- Finalize and organize your tech pack: Include all essential details like sketches, materials, measurements, and instructions.
- Securely share files: Use platforms like Google Drive or Dropbox with password protection, and bundle related documents.
- Add a cover note: Highlight key specifications, timelines, and instructions for clarity.
- Schedule a kickoff meeting: Align with your factory on every detail before production starts.
- Confirm samples and bulk production: Review prototypes, approve final samples, and lock in production timelines.
A well-prepared tech pack saves time, reduces sample rounds, and ensures better product quality. Follow these steps to streamline your production process and minimize errors.
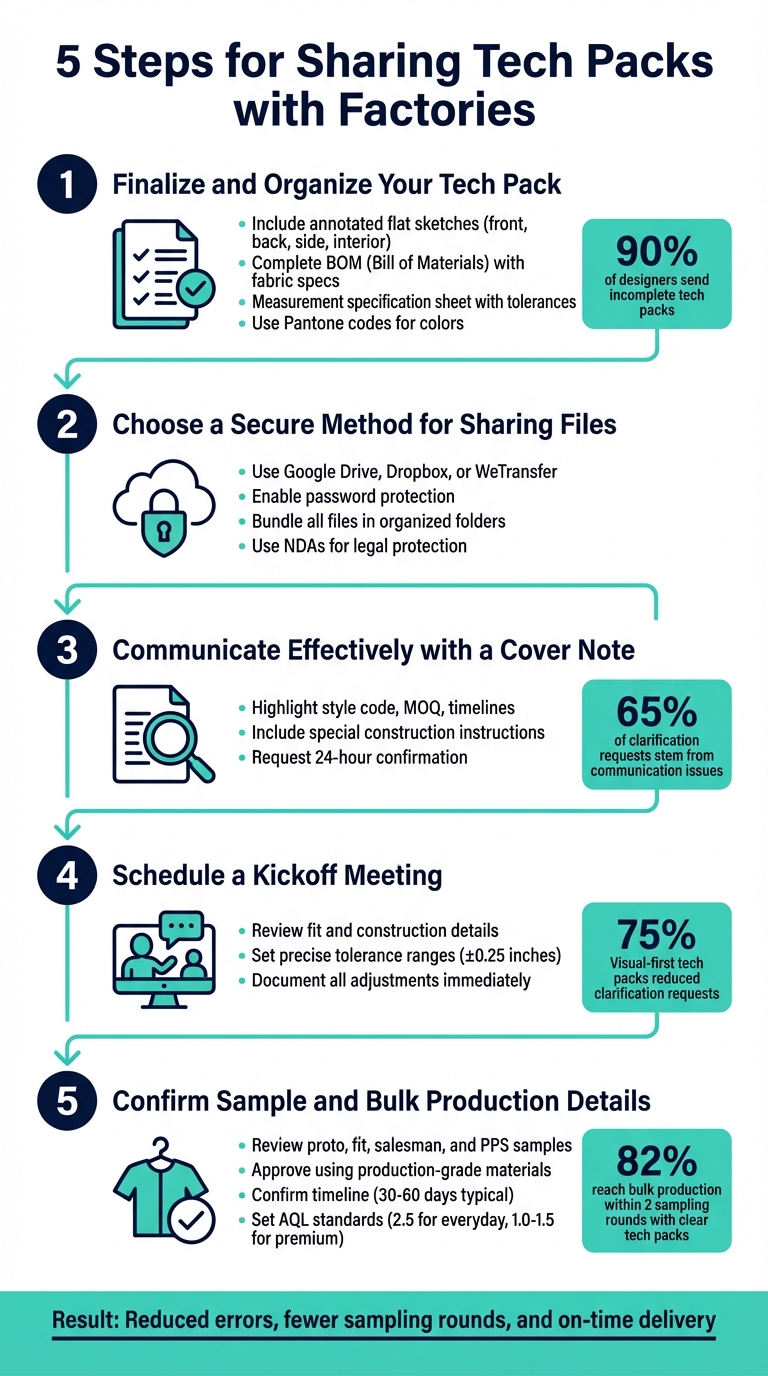
5-Step Process for Sharing Tech Packs with Factories
TEMPLATE INCLUDED | How To Create A Tech Pack To Send To Your Clothing Manufacturer
sbb-itb-8dbc09a
Step 1: Finalize and Organize the Tech Pack
Before sending your tech pack to the factory, make sure it’s complete and well-organized. Missing details can lead to production delays and extra costs – it’s worth noting that 90% of designers send incomplete tech packs. A thorough and polished document not only sets clear production expectations but also reflects a commitment to quality.
Include All Required Elements
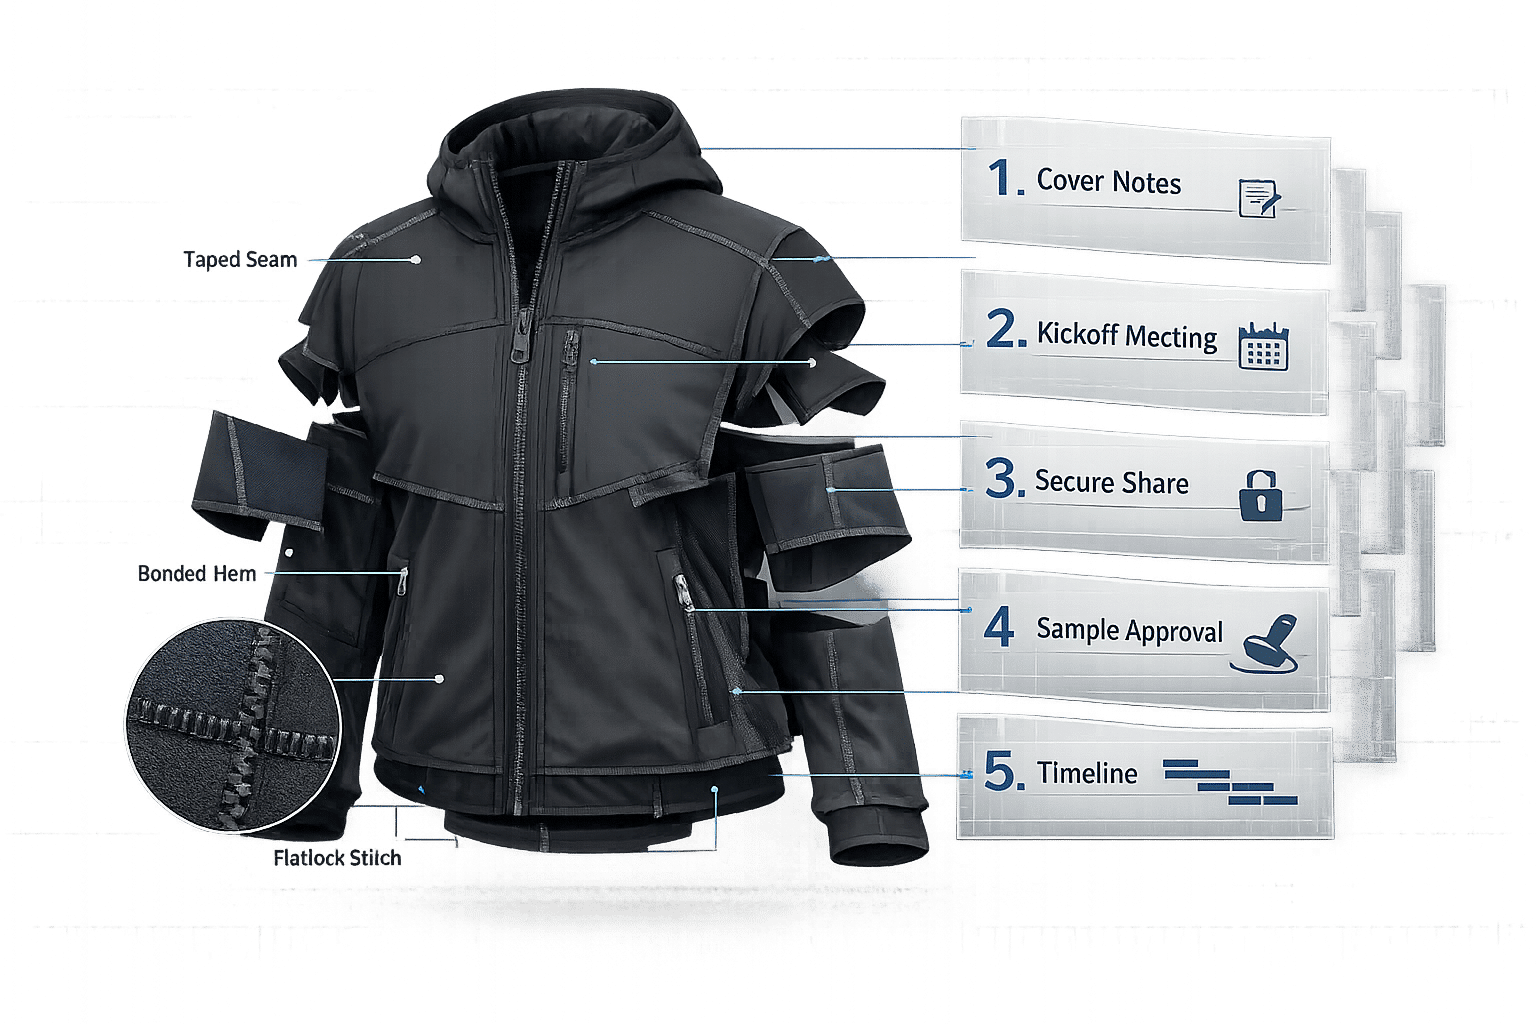
Your tech pack should be a one-stop resource for every detail the factory needs to accurately produce your garment. Start with annotated flat sketches showing the front, back, side, and interior views. Use clear callouts to highlight seams, stitches, and hardware placement.
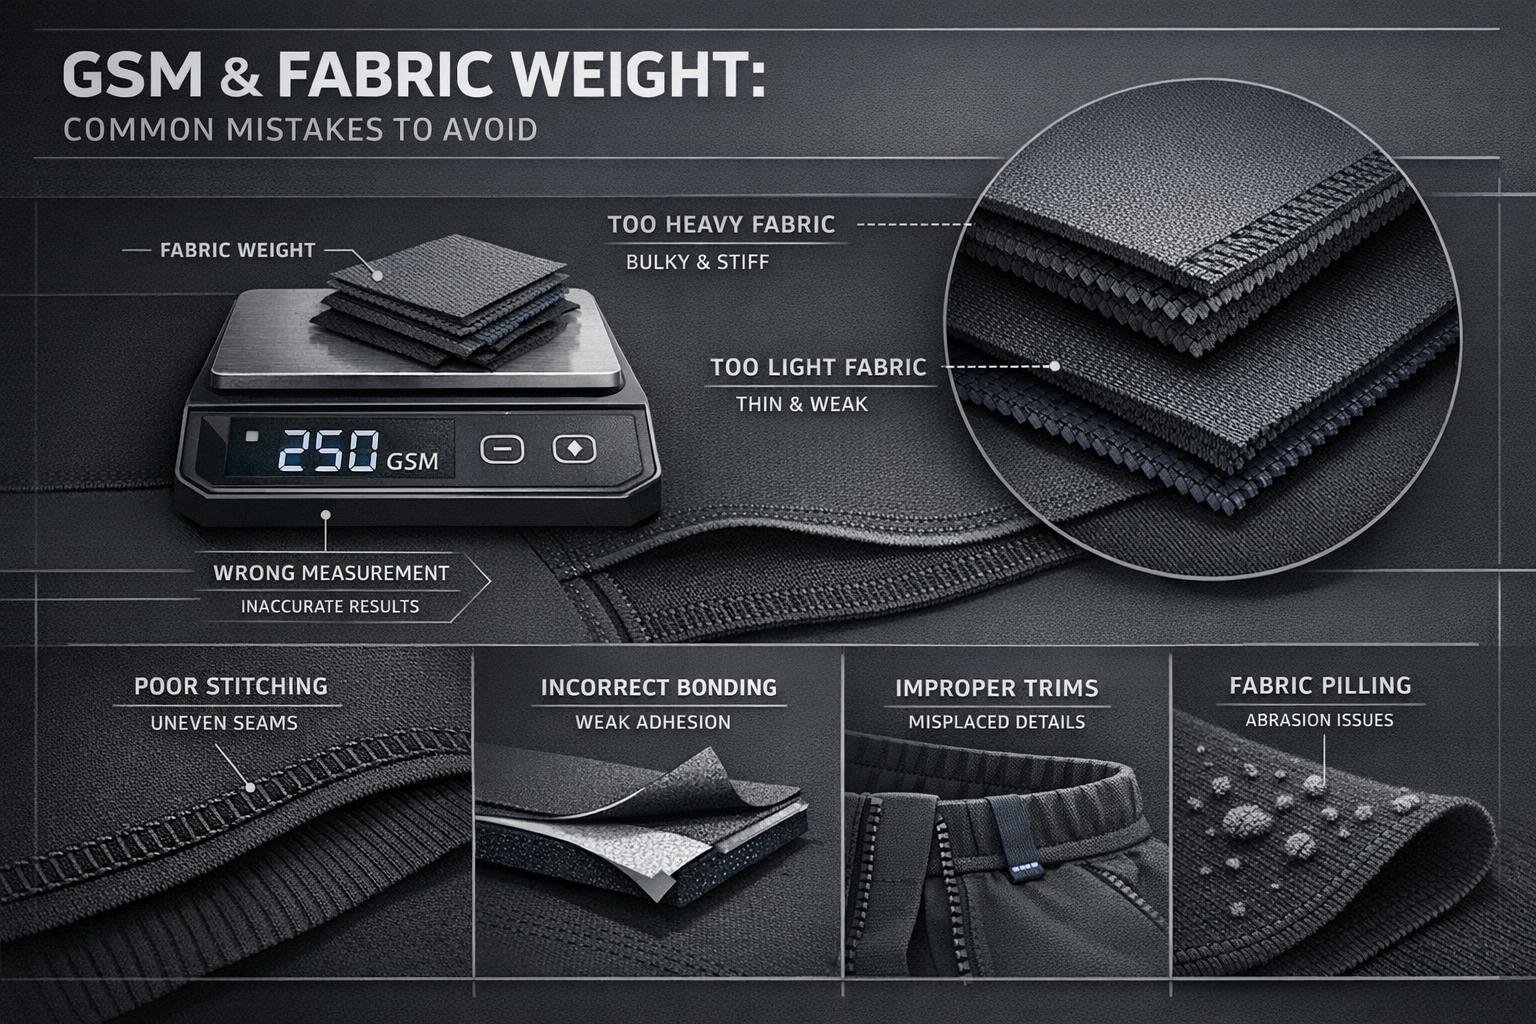
Next, ensure your BOM (Bill of Materials) is detailed. Include all primary fabrics with specifics like GSM (grams per square meter) and fiber content, as well as linings, threads, and trims (like zippers). This eliminates any guesswork for the factory.
Don’t forget the measurement specification sheet, which should outline Points of Measure (POM), target dimensions, and tolerances (e.g., ±0.5 inches). For activewear or technical garments, include details on seam types, stitches per inch, and reinforcement points in high-stress areas. When it comes to colorways, use standardized Pantone codes (such as TCX or TPG) to avoid confusion. Additionally, if your design includes artwork, provide scaled diagrams that specify exact placement distances from seams or necklines.
Once everything is included, focus on creating a clean, consistent layout. This ensures the document is easy to follow and up-to-date.
Use Clear Formatting and Version Control
Export your tech pack as a searchable PDF that compiles all pages into a single file. This approach prevents measurement distortions and ensures factories can access every detail in one place. Stick to a standardized file naming system, such as BrandName_ProductName_Version_Date.pdf. Display the version number, date, and style code on every page so that even if pages are separated, the factory can still identify the most current specifications.
Keep a revision log to track updates, including the date and editor for each change. As Techpacker explains:
"The tech pack also serves as a master document to track product development including comments, revisions, and any last-minute changes".
To further streamline the process, add a cover sheet summarizing key details like the style code, target MOQ (Minimum Order Quantity), sample timeline, and any special notes. This quick reference page helps factories understand the essentials at a glance.
Step 2: Choose a Secure Method for Sharing Files
Once your tech pack is complete, ensuring its secure delivery is a must. This step safeguards your intellectual property and avoids miscommunication during production. Sending files through casual chat apps or unprotected email attachments can lead to data breaches or loss, so it’s crucial to use secure platforms for file sharing.
Select Reliable Sharing Platforms
Platforms like Google Drive, Dropbox, and WeTransfer offer secure sharing features, such as permission-based access and password protection. These tools let you send tech packs via download links while controlling who can view or edit the files . Always double-check that only authorized personnel have access to these shared drives.
For brands juggling multiple styles or factory partnerships, Product Lifecycle Management (PLM) platforms are an excellent choice. These platforms provide advanced controls, including strict version tracking and the ability to assign multiple factories to a single tech pack. They also ensure that pricing and internal discussions are kept separate for each vendor . Some manufacturers even offer their own secure portals for direct file uploads, keeping everything within an encrypted system. For example, New Dong Huang Garment Co., Ltd. provides a portal specifically designed to protect shared files .
No matter which platform you choose, it’s wise to pair digital sharing with legal protections. Use Non-Disclosure Agreements (NDAs) and include intellectual property clauses in your contracts to prevent factories from reproducing or sharing your designs without permission. Once your files are sent securely, make sure to bundle all related documents for clarity.
Bundle Files and Provide Context
Organizing your files properly not only protects your designs but also helps the factory work more efficiently. Create a master folder with subfolders for everything the factory might need, such as:
- The tech pack
- Vector artwork (e.g., AI or EPS files for logos or prints)
- Reference images
- Supporting documents like fabric test reports
Adding a brief cover note can also be helpful. This note should summarize key details, including the style code, target Minimum Order Quantity (MOQ), sample timeline, and any specific construction or finishing instructions . As Lily from Clothing Manufacturing Guide points out:
"A well-prepared tech pack is the foundation for accurate, efficient, and cost-effective production".
After sharing the files, ask the manufacturer to confirm receipt and provide a summary of their understanding of the fabric, color, and MOQ. This step ensures they’ve accessed and interpreted the files correctly.
Step 3: Communicate Effectively with a Cover Note
After securely sharing your tech pack, the next step is to include a concise cover note. This ensures the factory fully grasps your project scope. While the tech pack dives into the finer details, the cover note acts as a quick, scannable guide to highlight the most critical specifications.
Think of the cover note as a one-page roadmap for your manufacturer. Factories often deal with a flood of files daily, so a well-structured summary can help your project stand out and be prioritized correctly. In fact, 65% of clarification requests in garment manufacturing stem from communication issues, not missing specifications. A clear cover note can help reduce these misunderstandings. As the Sewport Support Team puts it:
"If you’re not explicit with what you want and when you want it, manufacturers will consider it unimportant and ignore it."
Highlight Key Specifications and Expectations
Your cover note should include essential details to ensure the factory understands your requirements at a glance. These might include:
- Product identification: List the product name, unique style code, and season or collection reference.
- Order details: Specify your target minimum order quantity (MOQ) and, if relevant, your expected monthly capacity for scaling production.
- Timelines: Mention deadlines for sample delivery and bulk production to help the factory assess their ability to meet your schedule.
- Special instructions: Highlight any unique construction notes, such as specific print techniques (e.g., "puff print with rhinestones"). Don’t rely on the factory to comb through the full tech pack for these details.
- Sampling costs: For new partnerships, note expected costs for approved samples (e.g., "2x FOB for final approved samples") to align pricing expectations early.
Administrative details are equally important. Add the version number, creation or update date, and the designer’s name to maintain version control. If you’re resending an updated tech pack, emphasize changes using bold or capital letters to ensure updates are noticed. Once all this information is included, follow up promptly to keep the process moving.
Request Timely Confirmation
Always ask the factory to confirm receipt of your cover note and tech pack within 24 hours. Requesting a brief summary of key details – like fabric, color, MOQ, and lead time – can help catch any misinterpretations before production begins. Lily from Clothing Manufacturing Guide advises:
"Always confirm the manufacturer received the file. Ask them to reply with a quick summary of what they understood (fabric, color, MOQ, lead time). This avoids misunderstandings later."
Setting a clear confirmation deadline reduces the risk of delays. Research shows that brands using professional tech packs paired with clear instructions are 82% more likely to reach bulk production within two sampling rounds or fewer. This underscores how crucial it is to establish clarity from the start.
Step 4: Schedule a Kickoff Meeting
Once the factory confirms they’ve received your tech pack, it’s time to schedule a meeting to review it together. This step is crucial for catching any misunderstandings before production begins. Spending time upfront to align on every detail can save you weeks of back-and-forth later. Think of this meeting as the bridge between sharing your initial documents and starting production – it ensures everyone is on the same page.
For example, a technical apparel brand in Seattle adopted "visual-first" tech packs, pairing every written specification with a clear visual reference. This approach reduced their manufacturing clarification requests by 75% and improved first-sample accuracy from 70% to 92% across their product line.
Discuss Fit and Construction Details
Begin by walking through your technical flats and construction details with the factory’s pattern makers and production managers. To avoid translation issues, use standard ISO codes for stitches (e.g., 301 for lockstitch, 401 for chain stitch). Elaine Zhou, Business Director at Fumao Clothing, emphasizes:
"The most beautiful tech pack is worthless if production managers can’t translate it into manufacturing instructions."
Next, review the Points of Measure (POM) diagram and set precise ± tolerance ranges for each size. For instance, instead of vague terms like "close enough", specify exact tolerances like "±0.25 inches" for waistband measurements. Research shows that clear tolerance guidelines can reduce measurement rejections during quality control by 90%.
Also, confirm that all raw materials meet your standards for GSM, weight, and finish. Double-check the factory’s capacity, minimum order quantities (MOQs), and lead times to ensure they align with your delivery schedule.
Make sure to document any adjustments discussed during the meeting right away to avoid confusion later.
Document Adjustments in the Tech Pack
Any changes agreed upon during the meeting should be updated in the tech pack immediately. The tech pack serves as the ultimate guide for production, and relying on scattered email threads or meeting notes can lead to costly mistakes. Keeping it updated ensures it remains the single source of truth.
When sending out the revised tech pack, highlight changes in bold and include clear versioning details, such as "Brand_Leggings_TechPack_V3_02202026.pdf". You might also want to add a "Sample Fit Round Table" below the measurement table. This section helps track differences between your requested specifications and the samples you receive. It creates a clear audit trail, ensuring the factory doesn’t rely on outdated information and preventing disputes during production.
Step 5: Confirm Sample and Bulk Production Details
After the kickoff meeting, the next crucial step is creating samples to ensure every design element is perfect before moving to full-scale production. Each type of sample has a specific purpose: proto samples focus on overall shape and construction, fit samples check measurements and grading, salesman samples confirm visual details like prints and embroidery, and the Pre-Production Sample (PPS) acts as the final reference for bulk manufacturing. This step bridges the planning phase with the actual production process.
Review and Approve Prototypes
Precise communication is key when reviewing prototypes. Provide detailed and clear feedback (e.g., "the zipper is 10 cm too short") to avoid unnecessary delays. Annotated photos can help highlight construction issues, ensuring everyone is on the same page. This level of clarity speeds up the approval process and reduces misunderstandings.
To streamline the review, create a Fit Table that includes key details like Point of Measurement (POM), tolerance, target size, actual measurement, and any discrepancies. For instance, if the tech pack specifies a chest measurement of 38 inches ±0.25 inches, but the sample measures 37.5 inches, the table should clearly show the 0.5-inch shortfall and the necessary adjustment. This approach keeps the team aligned on what needs to be corrected.
Before approving the PPS, confirm it uses production-grade fabrics and hardware. As Ninghow puts it:
"The ‘golden standard’ is what the factory must follow for bulk".
Also, review important test results, such as shrinkage (denim can shrink 2% to 5% or more during processing), colorfastness, and stretch recovery data. Once all adjustments are finalized, provide written approval covering fit, color, wash, hardware, and labeling before moving forward with bulk production.
Confirm Timeline and Transition to Bulk
Once prototypes are approved, it’s time to lock in the final production details. Start by finalizing your Bill of Materials (BOM), making sure every component – from fabric to thread and packaging – is accounted for and available. Double-check with the factory to confirm that specific fabrics and Pantone-matched dyes are in stock to prevent mid-production delays.
Request a tiered pricing table based on order quantities. For example, denim might cost $45.00 per unit at a 30-piece minimum order quantity (MOQ) but drop to $12.00 per unit for an order of 2,000 pieces. Understanding these price breaks can help with budgeting and planning.
Set an Acceptable Quality Level (AQL) to define the pass/fail criteria for your production. AQL 2.5 is a common standard for everyday apparel, while premium brands often require stricter levels like AQL 1.0 or 1.5. Additionally, confirm your production slot with the factory – this ensures they allocate "line time" for your order once materials arrive. Typically, bulk production takes 30–60 days after PPS approval, with an extra week for quality control and packing.
Keep a signed copy of the approved PPS in your office, and ensure the factory has one on the production line for reference. This ensures consistency and minimizes errors during production.
Best Practices for Working with Experienced Factories
Once your tech pack is approved and production details are finalized, the next big step is teaming up with an experienced factory.
Partnering with Skilled Manufacturers
To get the best results, work with factories that specialize in your specific type of activewear – whether it’s knit or woven garments. Factories equipped with advanced tools like bonding machines and laser cutters can handle intricate designs with precision.
Take New Dong Huang Garment Co., Ltd., for example. With over 27 years of experience in activewear production, they combine cutting-edge equipment with advanced fabric technologies. Their offerings include eco-friendly materials, quick-dry finishes, and anti-UV treatments. Plus, their certifications – like BSCI, Sedex, and GRS – and audits from major brands such as Nike and New Balance demonstrate the level of quality and compliance you should expect from a seasoned partner.
The right manufacturer will also provide early feedback on potential issues, such as fabric limitations or complex construction details. This collaborative effort prevents costly errors and saves time. You should also ask for physical samples of their past work to assess stitching quality, finishing techniques, and material handling before making any commitments.
Choosing a skilled manufacturer is essential to hitting your production goals on time.
Meeting Delivery Deadlines
A well-prepared tech pack minimizes revisions, but clear communication is just as important for staying on schedule. Submitting a factory-friendly tech pack that uses standardized terms – like ASTM measurement standards and stitch classifications such as "401 SSa-1" instead of vague descriptions like "strong seam" – can cut production setup time by up to 85%.
After submission, schedule a review meeting within 48 hours to go over every section and confirm the factory’s understanding. This step helps catch any misinterpretations early, often reducing the number of sampling rounds from three to just one. As the Sewport Support Team explains:
"Manufacturers are busy and their attention span is scarce. As a rule of thumb, you want to be as direct and specific as possible when talking with them".
Don’t forget to account for factors like the factory’s local holidays, time zone differences, and current workload when setting deadlines. For instance, New Dong Huang Garment Co., Ltd. achieves a 99% on-time delivery rate by combining detailed quality checks with efficient workflows. When both sides work from the same master document and maintain clear communication, hitting deadlines becomes a realistic goal rather than a gamble.
Conclusion
Nailing down the details, securely sharing information, adding a cover note, scheduling a kickoff meeting, and confirming sample specifics are key steps to ensure smooth collaboration. A well-prepared tech pack lays the groundwork for clear communication and high-quality production.
By removing guesswork, a thorough tech pack helps minimize errors. It can also significantly reduce the number of sampling rounds, saving valuable time and cutting down on development costs.
Think of your tech pack as a living document that adapts through collaboration. Use clear, standardized terminology, specify exact tolerances for every measurement, and keep track of versions meticulously. When both parties rely on the same master document, hitting deadlines and achieving the desired quality becomes much more manageable.
FAQs
What’s the minimum a tech pack must include?
A tech pack is essential for clear communication with manufacturers. At the very least, it should include these core details:
- Fabric and Material Specifications: Outline the exact materials to be used.
- Measurements and Sizing: Provide precise dimensions for each size.
- Colors and Colorways: Specify the color options for the design.
- Trims, Accessories, Labels, and Tags: Include all additional components like zippers, buttons, and branding elements.
- Construction and Stitching Details: Describe how the item should be assembled.
Including these details ensures manufacturers can accurately bring your design to life, helping minimize mistakes and keeping production costs in check.
How do I protect my tech pack when sending it to a factory?
To keep your tech pack safe, it’s important to put confidentiality measures in place. Non-disclosure agreements (NDAs) and limiting file access are two effective ways to do this. Using secure, cloud-based platforms can also help you manage file sharing and prevent misuse.
Here are some key steps to consider:
- Sign NDAs: Always have your manufacturing partners sign NDAs to legally protect your information.
- Use secure platforms: Choose cloud platforms that offer controlled access to ensure only the right people can view or edit your files.
- Label documents: Clearly mark your tech pack as confidential and share it only with trusted individuals or teams.
By taking these precautions, you can better safeguard your designs and sensitive information.
When should I update the tech pack during sampling?
You should update the tech pack at every stage of sampling if there are any changes to the design, measurements, materials, or construction details. Always make these revisions before creating a new sample to ensure the factory has the most accurate and current information. Keeping the tech pack updated helps manage fit, verify fabric and trims, and ensures the final prototype aligns with your expectations, reducing the need for additional revisions.